Cart
0

Start with the yard, not the fixture catalogue
Here's the mistake almost every DIY landscape lighting project makes: you see a nice path light on a website, order eight of them, stick them in the ground, and then stand back and wonder why the yard looks like an airport runway. The fixtures weren't the problem. The lack of a plan was.
Good outdoor lighting design works backward from the space — what do you want people to see, where do they need to walk safely, and what should fade into the background? Answer those questions first, and the fixture choices become obvious. Skip them, and you're just guessing.
This guide walks you through a simple planning process you can do with a piece of graph paper and a Sunday afternoon before you spend a dollar on hardware.
Step 1: Sketch your yard to scale
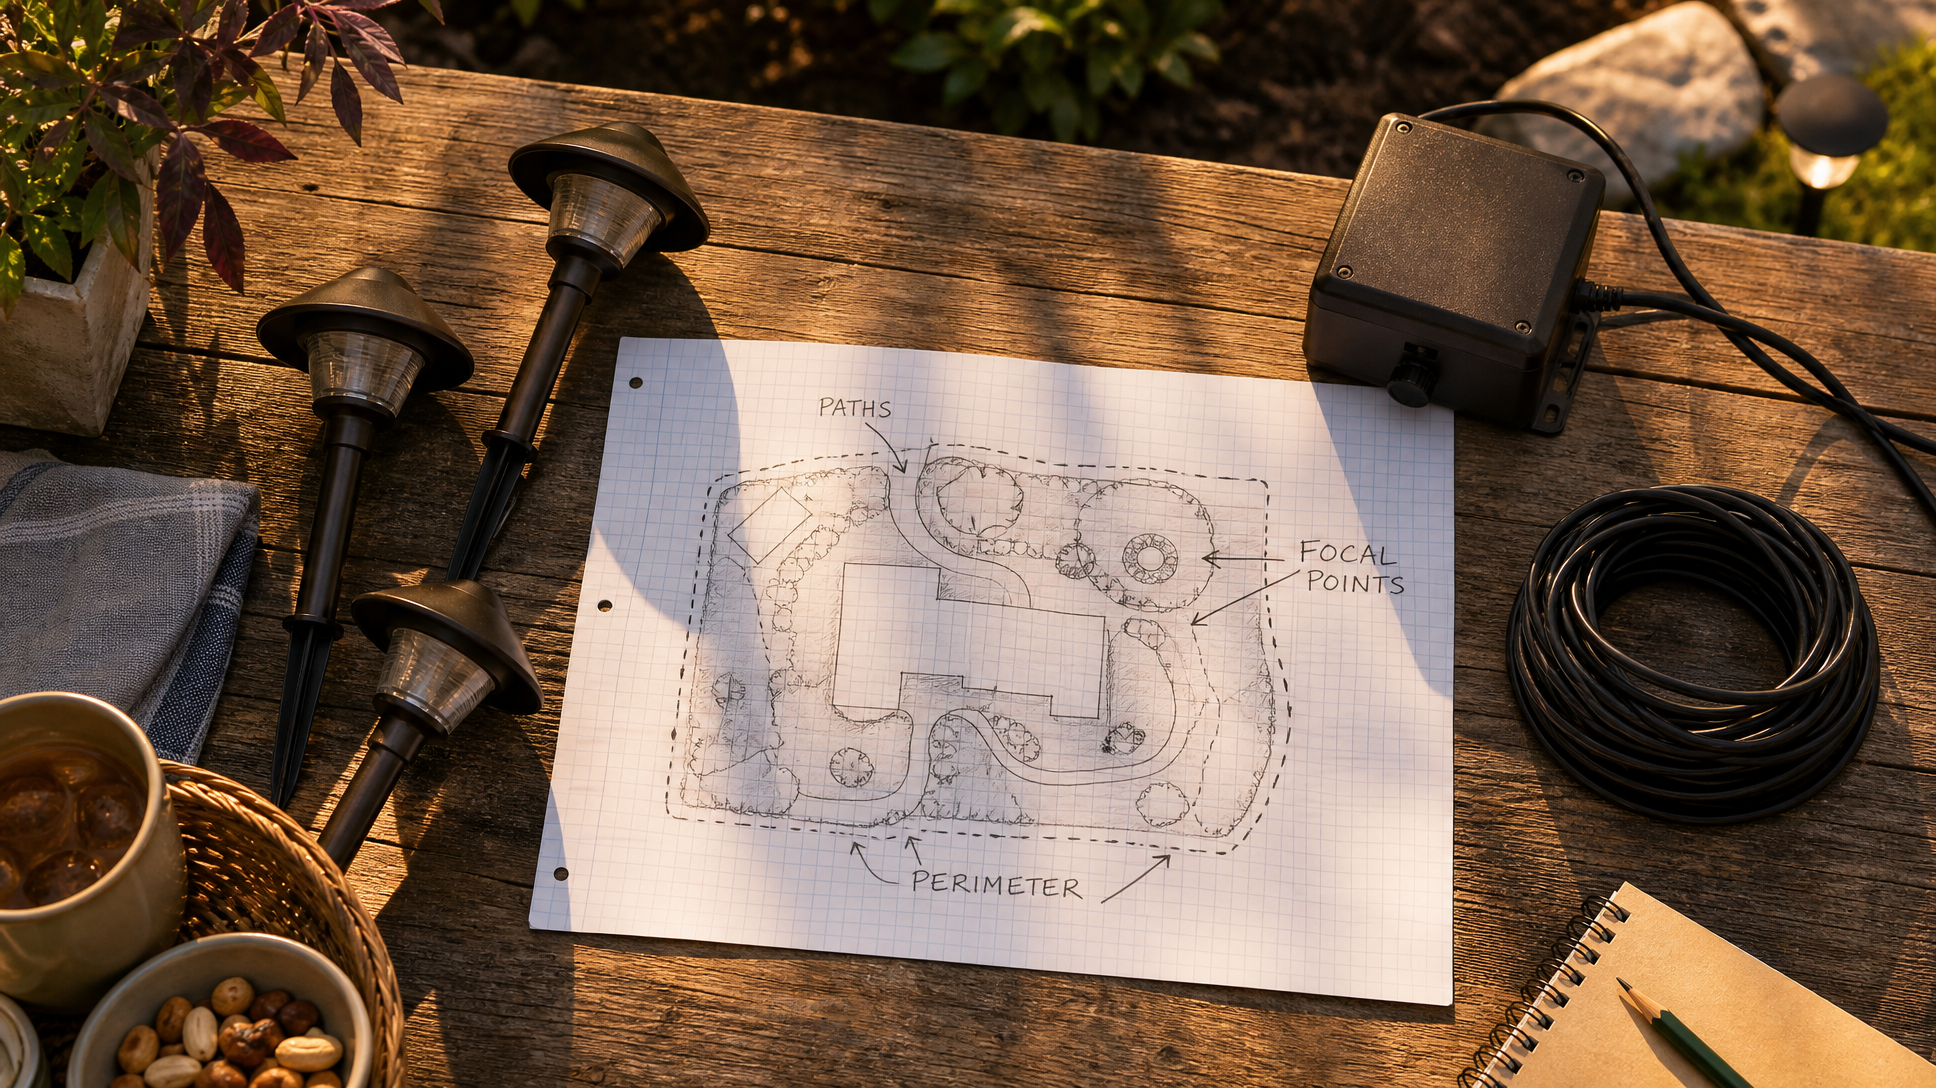
You don't need a professional survey. A rough, proportional sketch on graph paper is enough. Walk your property with a tape measure and note the key distances: the width of your front path, how far your driveway runs, the spread of any large trees or garden beds, and the distance from your house to the property line.
Mark your existing power sources — outdoor outlets, junction boxes, any conduit runs you already know about. These anchor points will shape your layout more than anything else, because running new underground wiring is the part of this project that most people underestimate in both effort and cost.
Once you have the sketch, step outside at dusk with a flashlight and physically walk the space. Notice what catches your eye naturally, where you feel uncertain about your footing, and which corners of the yard feel dark and a little unwelcoming. Mark those observations on your sketch. That walk is worth more than any mood board.
Step 2: Identify your three lighting zones
Every well-lit yard is really three overlapping systems working together. Getting clear on which zone you're designing for in each area prevents the "too much of one thing, not enough of another" problem.
Zone 1: Paths and walkways
This is safety lighting, and it has a clear job: guide people from point A to point B without anyone twisting an ankle. The goal isn't to flood the path with light — it's to define the edges so the route is readable at a glance. Low-profile path lights spaced evenly on alternating sides of a walkway do this well. If you space them too close together, you get that runway effect. Too far apart and there are dark gaps that defeat the purpose.
A good rule of thumb: place path lights so each one's pool of light just barely overlaps with the next. Walk the path yourself in the dark after installation and adjust from there — no spacing formula beats your own eyes.
Zone 2: Focal points
Focal point lighting is what gives a yard personality. This is the mature oak you want to uplift, the stone wall you want to wash with soft light, the architectural detail on your front facade, or a water feature that becomes a centerpiece at night. These lights are doing the aesthetic heavy lifting.
For trees and tall shrubs, in-ground uplights or well lights pointed at the base and angled upward create drama without glare. For walls and fences, a grazing technique — placing a fixture close to the surface and angling it to skim across the texture — makes even ordinary materials look interesting. Spotlights work best when they're aimed at a single subject, not scattered across a general area.
Pick two or three focal points maximum for a typical residential yard. More than that and nothing reads as special anymore.
Zone 3: Perimeter and ambient fill
This is the layer most DIYers skip entirely, and it's why some yards feel flat even when they have plenty of fixtures. Perimeter lighting — think low-wattage fixtures along fence lines, under deck railings, or tucked into garden bed borders — creates a sense of depth. It tells the eye where the yard ends, which paradoxically makes the space feel larger and more intentional.
This zone doesn't need to be bright. It just needs to exist. String lights along a pergola, low-voltage border lights around a garden bed, or even a few solar-powered stake lights along a fence line can do the job without a complicated wiring run.
Step 3: Choose fixture types to match the zone
Now — and only now — is the right moment to start looking at fixtures. With your sketch and your three zones mapped out, you're shopping with a clear brief instead of browsing blind.
For paths
Low-profile path lights (typically 12–18 inches tall) with a downward-facing shade are the standard for a reason. They direct light onto the ground, not into people's eyes. Look for fixtures with a wide enough beam spread to cover the path width without needing to be planted in the center of it.
For focal points
Uplights, well lights, and adjustable spotlights are your tools here. The key spec to pay attention to is beam angle — a narrow spot (around 15–25 degrees) concentrates light on a single subject; a wider flood (45 degrees or more) spreads it across a broader surface like a wall or hedge. Getting this wrong is the most common reason focal point lighting looks muddy.
For perimeter and ambient
This is where you have the most flexibility. Deck and step lights, in-ground border fixtures, string lights, and low-wattage bollards all work. The priority here is consistency of color temperature — mixing warm and cool white sources in the same zone looks jarring. Aim for a consistent color temperature across your entire yard for a cohesive result. Most residential landscape lighting sits in the warm white range, which tends to feel welcoming rather than clinical.
Low-voltage vs. line-voltage: the practical decision
Most DIY landscape lighting runs on a low-voltage system (typically 12V) powered by a transformer that plugs into a standard outdoor outlet. This is the right choice for the majority of homeowners: the wiring is safe to bury yourself in most jurisdictions without a licensed electrician, the fixtures are widely available, and the transformers are straightforward to program for dusk-to-dawn or timed operation.
Line-voltage (120V) fixtures are more powerful and better suited to large commercial-scale installations or situations where you need to run long cable distances without voltage drop. For a residential front or back yard, low-voltage is almost always the smarter starting point — and if you later want to add LED strip lighting to a deck or pergola, those systems integrate cleanly into the same low-voltage ecosystem.
One thing worth knowing about voltage drop: the longer your cable run from the transformer, the more voltage is lost along the way, which can cause fixtures at the far end of a run to appear dimmer than those near the source. The fix is either to use thicker gauge wire, shorten your runs by using multiple home-run cables from the transformer, or choose a transformer with multiple zones. Plan your cable runs on your sketch before you buy wire.
A note on light pollution and your neighbors
Aiming fixtures carefully isn't just an aesthetic choice — it's a neighborly one. Uplights and spotlights that aren't properly aimed can send light skyward or spill onto adjacent properties. The International Dark-Sky Association has long advocated for shielded, downward-directed fixtures that keep light where it's actually needed. Beyond the environmental argument, a fixture that glares into a neighbor's bedroom window is a fixture you'll be adjusting at 10 p.m. after a complaint. Get the aim right during installation.
The order of operations, summarized
- Sketch your yard with approximate dimensions and mark existing power sources.
- Walk the space at dusk and note where safety, focal interest, and perimeter definition are needed.
- Assign each area to a zone — path, focal point, or perimeter — before thinking about fixtures.
- Plan your cable runs from the transformer location, keeping runs as short as practical.
- Choose fixture types that match each zone's function, and lock in a consistent color temperature across the whole yard.
- Install, then adjust. No plan survives first contact with the actual dark — give yourself a week of evenings to tweak angles and spacing before you bury cables or set anything permanently.
The last step is the one most people skip because it feels like admitting the plan wasn't perfect. It wasn't — no plan is. The adjustment phase is where a decent landscape lighting job becomes a great one.
When you're ready to start matching fixtures to your layout, browse the outdoor lighting options at LightsDaddy — path lights, uplights, and perimeter fixtures across a range of styles and budgets, so you can shop to your plan rather than the other way around.
Frequently Asked Questions
How many path lights do I actually need for a typical front walkway?
It depends on the length of the path and the beam spread of the fixture you choose, but the guiding principle is that each light's pool of illumination should just overlap with the next one — no dark gaps, no blinding overlap. Alternating lights on each side of the path (rather than placing them directly opposite each other) tends to look more natural and requires fewer fixtures. Measure your path, check the fixture's listed beam spread, and space from there rather than guessing a number upfront.
Do I need an electrician to install low-voltage landscape lighting?
In most cases, no. Low-voltage landscape lighting systems run off a transformer that plugs into a standard outdoor GFCI outlet, and the low-voltage cable itself is generally safe to bury yourself without a licensed electrician in most U.S. jurisdictions. That said, if you need a new outdoor outlet installed, or if you're planning any line-voltage (120V) fixtures, you should bring in a licensed electrician for that portion of the work. Always check your local code requirements before you dig.
What color temperature should I use for outdoor landscape lighting?
Most residential landscape lighting looks best in the warm white range — roughly 2700K to 3000K on the Kelvin scale. This range feels welcoming and works well with natural materials like wood, stone, and foliage. Cooler whites (4000K and above) can look stark and institutional in a garden setting. The most important thing is consistency: mixing color temperatures across different zones of the same yard creates a disjointed look, so pick one and stick with it throughout.
Can I mix solar and wired fixtures in the same landscape lighting plan?
You can, but go in with realistic expectations about solar. Solar fixtures depend on daily sun exposure to charge, so their brightness and run time vary with the seasons and your local climate. They work well as supplemental perimeter or accent lighting in spots that get reliable sun, but they're not a dependable substitute for wired fixtures in your primary path or focal point zones. If you use both, try to keep solar fixtures in one distinct zone so any inconsistency in brightness doesn't undermine the overall effect.